Introduction
This guide covers all available installation methods for Tyk Self-Managed. For most users, we recommend starting with Docker or Kubernetes (Helm) as these provide the easiest setup experience and are our most actively maintained deployment options.Recommended Installation Methods


Install with Docker
Tyk has three containers that are available to set up a Docker installation: All three are required for a full deployment. We recommend that each container is installed on a separate machine for optimum performance. From v5.5.0 onwards, these images are based on distroless. This means that you will not be able to obtain a shell withdocker run --rm -it tykio/tyk-gateway:v5.5.0 sh. The image can be inspected with tools like dive or Docker Desktop.
We also have a Docker Tyk Pro Demo, which installs our full Self-Managed solution, which includes our Gateway, Dashboard, and analytics processing pipeline. This demo will run Tyk Self-Managed on your machine.
Install on Kubernetes
The main way to install Tyk Self-Managed in a Kubernetes cluster is via Helm charts. We are actively working to add flexibility and more user flows to our chart. Please reach out to our teams on support or the community forum if you have questions, requests or suggestions for improvements. Get started with one of our quick start guides: Or go to Tyk Stack helm chart for detailed installation instructions and configuration options.Install Tyk Stack with Helm Chart (PostgreSQL)
The following guides provide instructions to install Redis, PostgreSQL, and Tyk stack with default configurations. It is intended for quick start only. For production, you should install and configure Redis and PostgreSQL separately. Prerequisites Quick Start The following quick start guide explains how to use the Tyk Stack Helm chart to configure a Dashboard that includes:- Redis for key storage
- PostgreSQL for app config
- Tyk Pump to send analytics to PostgreSQL. It also opens a metrics endpoint where Prometheus (if available) can scrape from.
dashboard-svc-tyk-tyk-dashboard at port 3000. You can login to Dashboard using the admin email and password to start managing APIs. Tyk Gateway will be accessible through service gateway-svc-tyk-tyk-gateway.tyk.svc at port 8080.
1. Setup required credentials
First, you need to provide Tyk license, admin email and password, and API keys. We recommend to store them in secrets.
tyk-redis-master.tyk.svc:6379 (Tyk needs the name including the port)
The Bitnami chart also creates a secret tyk-redis which stores the connection password in redis-password. We will make use of this secret in installation later.
3. Install PostgreSQL (if you don’t already have PostgreSQL installed)
If you do not already have PostgreSQL installed, you may use these charts provided by Bitnami.
Ensure that you are installing PostgreSQL versions that are supported by Tyk. Please consult the list of supported versions that are compatible with Tyk.
dashboard-svc-tyk-tyk-dashboard at port 3000. You can login to Dashboard using the admin email and password to start managing APIs. Tyk Gateway will be accessible through service gateway-svc-tyk-tyk-gateway.tyk.svc at port 8080.
You are now ready to create an API.
For the complete installation guide and configuration options, please see Tyk Stack Helm Chart.
Install Tyk Stack with Helm Chart (MongoDB)
The following guides provide instructions to install Redis, MongoDB, and Tyk stack with default configurations. It is intended for quick start only. For production, you should install and configure Redis and MongoDB separately. Prerequisites- Kubernetes 1.19+
-
Helm 3+
If you want to enable Tyk Enterprise Developer Portal, please use PostgreSQL. MongoDB is not supported in Developer Portal.
- Redis for key storage
- MongoDB for app config
- Tyk Pump to send analytics to MongoDB. It also opens a metrics endpoint where Prometheus (if available) can scrape from.
dashboard-svc-tyk-tyk-dashboard at port 3000. You can login to Dashboard using the admin email and password to start managing APIs. Tyk Gateway will be accessible through service gateway-svc-tyk-tyk-gateway.tyk.svc at port 8080.
1. Setup required credentials
First, you need to provide Tyk license, admin email and password, and API keys. We recommend to store them in secrets.
tyk-redis-master.tyk.svc:6379 (Tyk needs the name including the port)
The Bitnami chart also creates a secret tyk-redis which stores the connection password in redis-password. We will make use of this secret in installation later.
Please make sure you are installing Redis versions that are supported by Tyk. Please refer to Tyk docs to get list of supported versions.
Please make sure you are installing MongoDB versions that are supported by Tyk. Please refer to Tyk docs to get list of supported versions.
Bitnami MongoDB image is not supported on darwin/arm64 architecture.
Ensure that you are installing MongoDB versions that are supported by Tyk. Please consult the list of supported versions that are compatible with Tyk.
dashboard-svc-tyk-tyk-dashboard at port 3000. You can login to Dashboard using the admin email and password to start managing APIs. Tyk Gateway will be accessible through service gateway-svc-tyk-tyk-gateway.tyk.svc at port 8080.
You are now ready to create an API.
For the complete installation guide and configuration options, please see Tyk Stack Helm Chart.
Tyk Dependencies and Database Support
MongoDB / PostgreSQL
Tyk Dashboard requires a persistent datastore for its operations. By default MongoDB is used. From Tyk v4.0, we also support PostgreSQL. See Database Options for a list of versions and drop-in replacements we support.Redis
Tyk Gateway requires Redis for its operations. Here is the list of supported versions: Supported Versions- Tyk 5.3 supports Redis 6.2.x, 7.0.x, and 7.2.x
- Tyk 5.2.x and earlier supports Redis 6.0.x and Redis 6.2.x only.
Tyk Gateway Architecture
The Tyk Gateway can run completely independently, requiring only a Redis database, and can scale horizontally: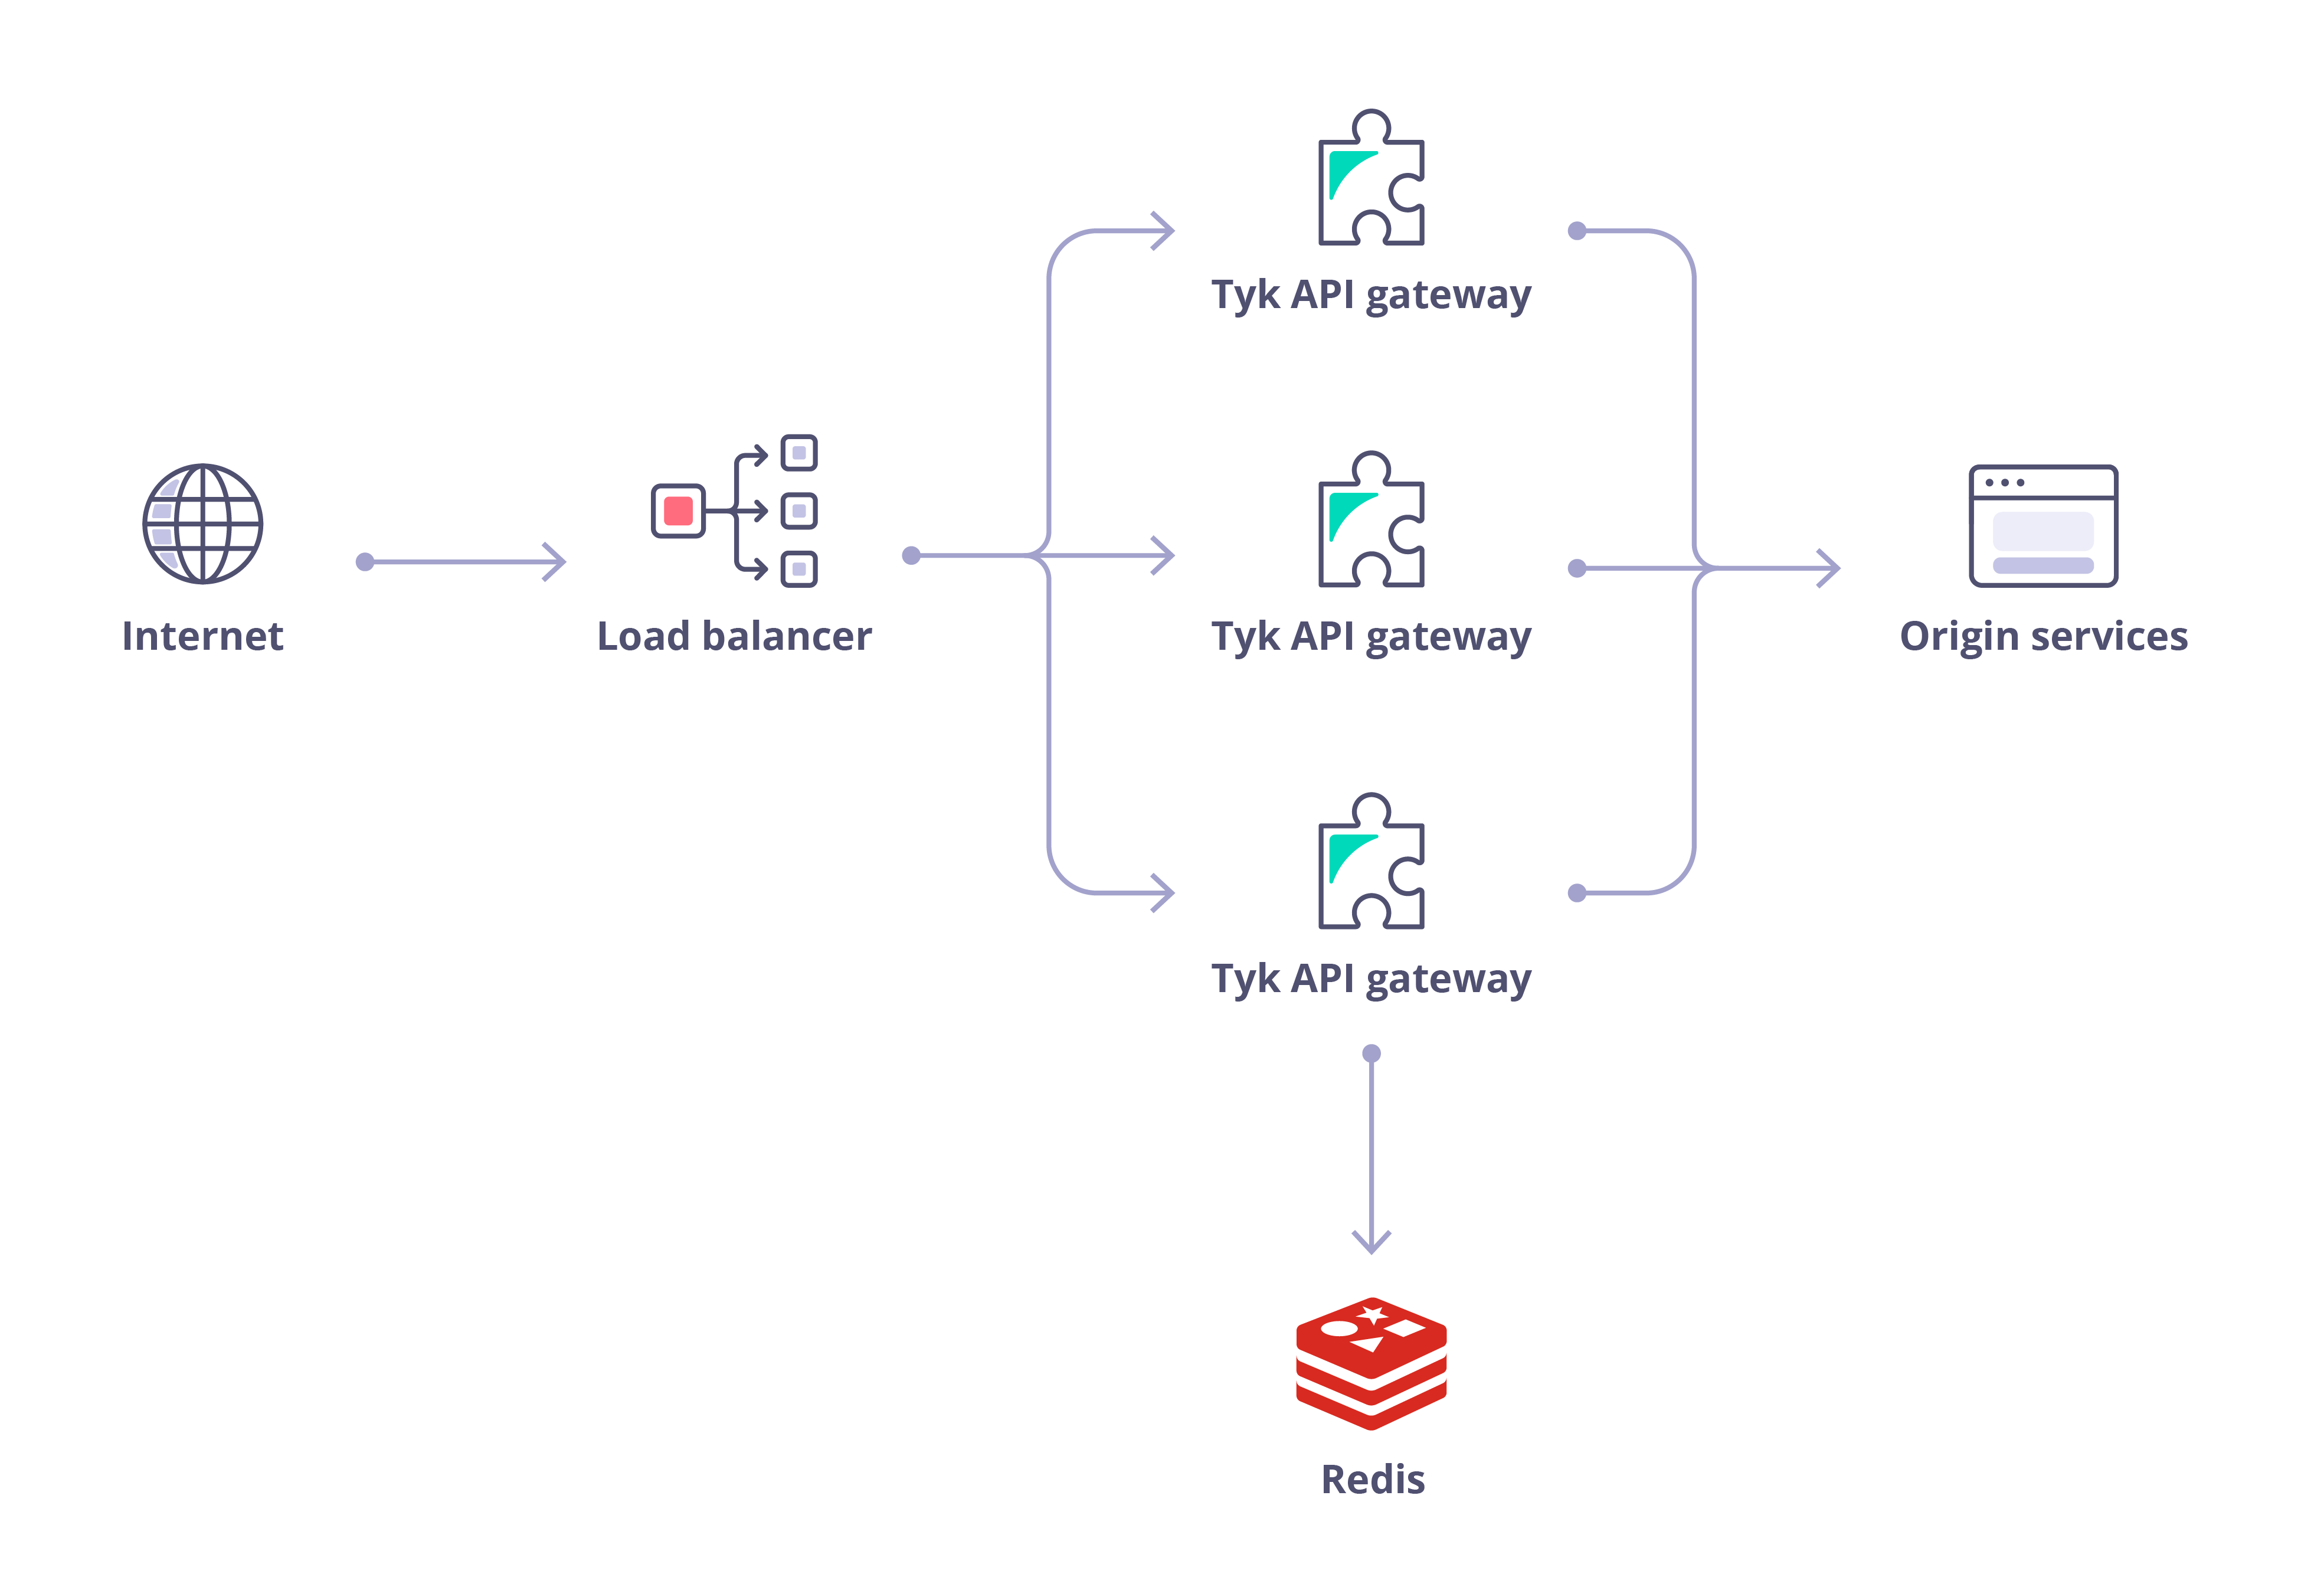
Init Systems
Tyk packages support systemd and SysVinit Linux init systems.- RHEL 9+, Ubuntu 22.04+, Debian 11+ use systemd
- Certain older distros may only provide SysVinit but all of them typically provide compatibility with its scripts
install/inits directory inside the package directory.
systemd
For systemd, eithersystemctl or service commands may be utilized.
The service command can usually be used with SysVinit scripts, as well as invoking them directly.
systemd utilizes its own logging mechanism called journald, which is usable via the
journalctl command, e.g. journalctl -u tyk-gatewayPlease consult with respective init system documentation for more details on how to use and configure it.Install using Bootstrap CLI
To list the available flags, executetyk-analytics bootstrap -h:
bootstrap command makes bootstrapping easier. It helps you to create organizations and users. The command needs a
config file path. By default, it looks at tyk_analytics.conf in the directory where the tyk-analytics binary is located.
For example:
tyk-analytics bootstrap
You can also give the path of a custom config file with the --conf flag. For example:
tyk-analytics bootstrap --conf some-directory/custom.conf
The tool can work in both auto and interactive modes. You can use the flags while running the command or you can just run
it without flags and use interactive mode.
Environment Variables
You can override the config values by environment variables. See how to configure an environment variable.
For example, you can override hostname, port, mongo url, redis host and redis port values by exporting the following variables:
- TYK_DB_HOSTCONFIG_HOSTNAME
- TYK_DB_LISTENPORT
- TYK_DB_MONGOURL
- TYK_DB_REDISHOST
- TYK_DB_REDISPORT
Alternative Installation Methods
The following installation methods are available for specific use cases. For most users, we recommend the Docker or Kubernetes methods above.Install on AWS Marketplace
Install on AWS Marketplace
Tyk offers a flexible and powerful API management solution through Tyk Cloud on the AWS Marketplace. Tyk Cloud is an end-to-end managed API platform where both the control plane and gateways are installed on AWS for a seamless, fully cloud-hosted experience.For those who need more deployment flexibility, Tyk Cloud also supports a Hybrid Gateway option. In this setup, the control plane remains hosted and managed by Tyk on AWS, while the gateways can be deployed on your preferred cloud provider or on-premises environment—allowing you to meet data locality and compliance needs without sacrificing control.Available AWS Deployment RegionsYou can deploy Tyk Cloud in the following AWS regions:and fill out the Bootstrap form!
If you see any page besides the Bootstrap page, you have pasted the license key incorrectly
- Singapore:
aws-ap-southeast-1 - Frankfurt, Germany:
aws-eu-central-1 - London, UK:
aws-eu-west-2 - N. Virginia, USA:
aws-us-east-1 - Oregon, USA:
aws-us-west-2 - Australia:
aws-ap-southeast-2
-
Spin up an EC2 instance, AWS Linux2 preferably, T2.Medium is fine
- add a public IP
- open up SG access to:
- 3000 for the Tyk Dashboard
- 8080 for the Tyk Gateway
- 22 TCP for SSH
-
SSH into the instance
ssh -i mykey.pem ec2-user@public-ec2-ip - Install Git, Docker, & Docker Compose Feel free to copy paste these
- Clone the Tyk Pro Docker repo
- Add the license key to
confs/tyk_analytics.confinto thelicense_key variableusing “vi” or “nano”, etc
tyk_analytics.conf, license_key should look something like this, with a real license however:"license_key": "eyJhbGciOiJSUzI1NiIsInR5cCI...WQ",- Run the containers via
docker-compose
- Visit
Install on Microsoft Azure
Install on Microsoft Azure
Azure is Microsoft’s cloud services platform. It supports both the running of Ubuntu Servers, as well as Docker and Docker-Compose.For more details, see the Azure Documentation.Tyk Installation Options for AzureAzure allows you to install Tyk in the following ways:On-Premises
- Via our Ubuntu Setup on an installed Ubuntu Server on Azure.
- Via our Docker Installation using Azure’s Docker support.
We also have a blog post that walks you through installing Tyk on Azure.
Install on Google Cloud
Install on Google Cloud
GCP is Google’s Cloud services platform. It supports both the running of Ubuntu Servers and Docker.For more details, see the Google Cloud Documentation.Tyk Installation Options for Google CloudGoogle Cloud allows you to install Tyk in the following ways:On-Premises
- Via our Ubuntu Setup on an installed Ubuntu Server within Google Cloud.
- Via our Docker Installation using Google Cloud’s Docker support.
- Configure Cloud Run to have the CPU always allocated option enabled. Otherwise, the Tyk Pump container needs to warm up, which takes approximately 1 min. Subsequently, by this time the stats are removed from Redis.
- Update the Tyk Gateway configuration to keep the stats for 3 mins to allow Tyk Pump to process them. This value should be greater than the Pump purge delay to ensure the analytics data exists long enough in Redis to be processed by the Pump.
Install on Heroku
Install on Heroku
Install Tyk API Gateway on HerokuA full Tyk Self-Managed installation can be deployed to Heroku dynos and workers using Heroku Container Registry and Runtime functionality. This guide will utilize Tyk Docker images with a small amount of customization as well as an external MongoDB service.Prerequisites
Heroku’s free tier is no longer available. Please review Heroku’s pricing for current options.
- Docker daemon installed and running locally
- Heroku account
- Heroku CLI installed
- MongoDB service (such as Atlas)
- Tyk License
- Checkout the Tyk quickstart repository from GitHub
Install Tyk Stack on Windows with Helm
Install Tyk Stack on Windows with Helm
Installing Tyk on Kubernetes requires a multi-node Tyk license. If you are evaluating Tyk on Kubernetes, contact us to obtain a temporary license.
You use this at your own risk. Tyk is not supported on the Windows platform. However you can test it as a proof of concept using our Pro Demo Docker installation.
- MS Windows 10 Pro
- Tyk Helm Chart
- Docker Desktop for Windows running with a signed in Docker ID
- minikube
- Kubectl
- Helm
- Git for Windows
- Python for Windows
- PowerShell running as administrator
- Our Pro Demo Docker GitHub repo
- A free Tyk Self-Managed Developer license
Use Legacy Helm Chart (Deprecated)
Use Legacy Helm Chart (Deprecated)
For documentation on the deprecated
tyk-pro Helm chart, please see the GitHub repository.Install Tyk on Red Hat (RHEL)
Supported Distributions| Distribution | Version | Supported |
|---|---|---|
| RHEL | 9 | ✅ |
Install Database
Install and Configure Dependencies Redis Tyk Gateway has a dependency on Redis. Follow the steps provided by Red Hat to make the installation of Redis, conducting a search for the correct version and distribution. Storage Database Tyk Dashboard has a dependency on a storage database that can be PostgreSQL or MongoDB. Option 1: Install PostgreSQL Check the PostgreSQL supported versions. Follow the steps provided by PostgreSQL to install it. Configure PostgreSQL Create a new role/userInstall Dashboard
Tyk has its own signed RPMs in a YUM repository hosted by the kind folks at packagecloud.io, which makes it easy, safe and secure to install a trusted distribution of the Tyk Gateway stack. Prerequisites- Ensure port
3000is open: This is used by the Dashboard to provide the GUI and the Classic Developer Portal. - Follow the steps provided in this link Getting started on Red Hat (RHEL) to install and configure Tyk dependencies.
-
Set up YUM Repositories
First, install two package management utilities
yum-utilsand a file downloading toolwget:Then install Python: -
Configure and Install the Tyk Dashboard
Create a file named
/etc/yum.repos.d/tyk_tyk-dashboard.repothat contains the repository configuration settings for YUM repositoriestyk_tyk-dashboardandtyk_tyk-dashboard-sourceused to download packages from the specified URLs, including GPG key verification and SSL settings, on a Linux system. Make sure to replaceeland9in the config below with your Linux distribution and version:We’ll need to update the YUM package manager’s local cache, enabling only thetyk_tyk-dashboardrepository while disabling all other repositories--disablerepo='*' --enablerepo='tyk_tyk-dashboard', and confirm all prompts-y.Install Tyk dashboard: -
Confirm Redis and MongoDB or PostgreSQL are running
Start Redis since it is always required by the Dashboard.
Then start either MongoDB or PostgreSQL depending on which one you are using.
- Configure Tyk Dashboard
- MongoDB
- SQL
<Redis Hostname>, <Mongo IP Address> and <Mongo Port> with your own values to run this script.--listenport=3000: Tyk Dashboard (and Portal) to listen on port3000.--redishost=<hostname>: Tyk Dashboard should use the local Redis instance.--redisport=6379: The Tyk Dashboard should use the default port.--domain="XXX.XXX.XXX.XXX": Bind the Dashboard to the IP or DNS hostname of this instance (required).--mongo=mongodb://<Mongo IP Address>:<Mongo Port>/tyk_analytics: Use the local MongoDB (should always be the same as the Gateway).--storage=postgres: In case, your preferred storage Database is PostgreSQL, use storage type “postgres” and specify connection string.--connection_string=postgresql://<User>:<Password>@<PostgreSQL Host Name>:<PostgreSQL Port>/<PostgreSQL DB>: Use the PostgreSQL instance provided in the connection string (should always be the same as the gateway).--tyk_api_hostname=$HOSTNAME: The Tyk Dashboard has no idea what hostname has been given to Tyk, so we need to tell it, in this instance we are just using the local HOSTNAME env variable, but you could set this to the public-hostname/IP of the instance.--tyk_node_hostname=http://localhost: The Tyk Dashboard needs to see a Tyk node in order to create new tokens, so we need to tell it where we can find one, in this case, use the one installed locally.--tyk_node_port=8080: Tell the Dashboard that the Tyk node it should communicate with is on port 8080.--portal_root=/portal: We want the Portal to be shown on /portal of whichever domain we set for the Portal.
-
Start Tyk Dashboard
Notice how we haven’t actually started the gateway yet, because this is a Dashboard install, we need to enter a license first.To check the logs from the deployment run:
When using PostgreSQL you may receive the error:
"failed SASL auth (FATAL: password authentication failed for user...)", follow these steps to address the issue:- Open the terminal or command prompt on your PostgreSQL server.
- Navigate to the location of the
pg_hba.conffile. This file is typically located at/var/lib/pgsql/13/data/pg_hba.conf. - Open the
pg_hba.conffile using a text manipulation tool. - In the
pg_hba.conffile, locate the entry corresponding to the user encountering the authentication error. This entry might resemble the following:
- In the entry, find the METHOD column. It currently has the value scram-sha-256.
- Replace scram-sha-256 with md5, so the modified entry looks like this:
- Save the changes you made to the
pg_hba.conffile. - Restart the PostgreSQL service to apply the modifications:
-
Enter Dashboard license
Add your license in
/var/opt/tyk-dashboard/tyk_analytics.confin thelicensefield. If all is going well, you will be taken to a Dashboard setup screen - we’ll get to that soon. -
Restart the Dashboard process
Because we’ve just entered a license via the UI, we need to make sure that these changes get picked up, so to make sure things run smoothly, we restart the Dashboard process (you only need to do this once) and (if you have it installed) then start the gateway:
-
Go to the Tyk Dashboard URL
Go to the following URL to access to the Tyk Dashboard:
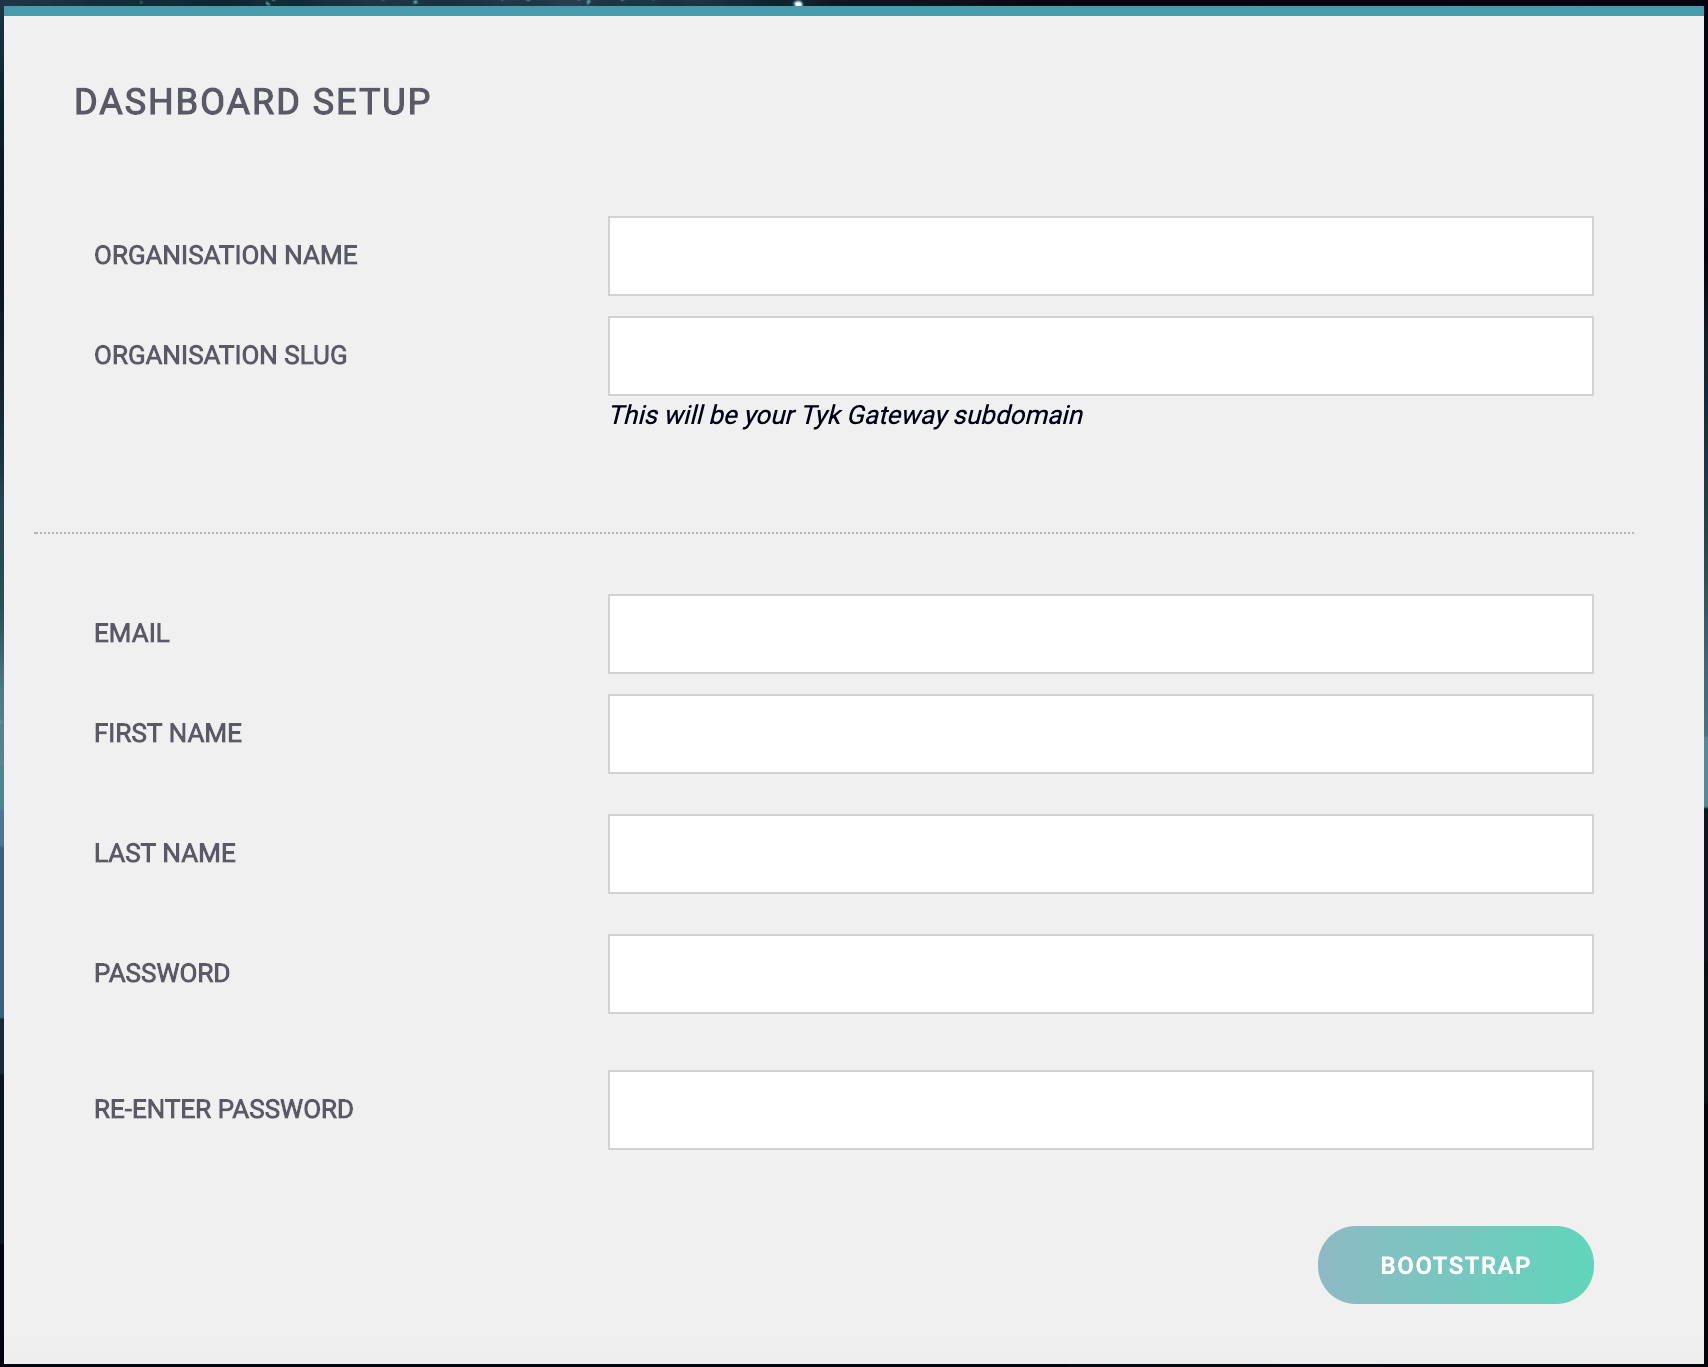
You should get to the Tyk Dashboard Setup screen:
-
Create your Organization and Default User
You need to enter the following:
- Your Organization Name
- Your Organization Slug
- Your User Email Address
- Your User First and Last Name
- A Password for your User
- Re-enter your user Password
Click Bootstrap to save the details.For a password, we recommend a combination of alphanumeric characters, with both upper and lower case letters. -
Login to the Dashboard
You can now log in to the Tyk Dashboard from
127.0.0.1:3000, using the username and password created in the Dashboard Setup screen. Configure your Developer Portal To set up your Developer Portal follow our Self-Managed tutorial on publishing an API to the Portal Catalog.
Install Pump
Tyk has it’s own signed RPMs in a YUM repository hosted by the kind folks at packagecloud.io, which makes it easy, safe and secure to install a trusted distribution of the Tyk Gateway stack. Prerequisites We are assuming that Redis and either MongoDB or SQL are installed (these are installed as part of the Tyk Gateway and Dashboard installation guides) Step 1: Set up YUM Repositories First, we need to install some software that allows us to use signed packages:/etc/yum.repos.d/tyk_tyk-pump.repo that contains the repository configuration below:
Make sure to replace el and 9 in the config below with your Linux distribution and version:
You need to replace
<hostname> for --redishost=<hostname>, and <Mongo IP Address>, <Mongo Port> for --mongo=mongodb://<Mongo IP Address>:<Mongo Port>/ with your own values to run this script.You need to replace
<hostname> for --redishost=<hostname>, and <Postgres Host Name>,<Port>, <User>, <Password>, <DB> for --postgres="host=<Postgres Host Name> port=<Port> user=<User> password=<Password> dbname=<DB>" with your own values to run this script.Install Gateway
Tyk has it’s own signed RPMs in a YUM repository hosted by the kind folks at packagecloud.io, which makes it easy, safe and secure to install a trusted distribution of the Tyk Gateway stack. Prerequisites- Ensure port
8080is open: this is used in this guide for Gateway traffic (API traffic to be proxied) - EPEL (Extra Packages for Enterprise Linux) is a free, community based repository project from Fedora which provides high quality add-on software packages for Linux distribution including RHEL. In our case we need it for Redis.
/etc/yum.repos.d/tyk_tyk-gateway.repo that contains the repository configuration below https://packagecloud.io/tyk/tyk-gateway/install#manual-rpm:
Configure Tyk Gateway with the Dashboard
Prerequisites This configuration assumes that you have already installed Tyk Dashboard, and have decided on the domain names for your Dashboard and your Portal. They must be different. For testing purposes, it is easiest to add hosts entries to your (and your servers)/etc/hosts file.
Set up Tyk Gateway with Quick Start Script
You can set up the core settings for Tyk Gateway with a single setup script, however for more involved deployments, you will want to provide your own configuration file.
You need to replace
<hostname> for --redishost=<hostname>with your own value to run this script.--dashboard=1: We want to use the Dashboard, since Tyk Gateway gets all it’s API Definitions from the Dashboard service, as of v2.3 Tyk will auto-detect the location of the dashboard, we only need to specify that we should use this mode.--listenport=8080: Tyk should listen on port 8080 for API traffic.--redishost=<hostname>: Use Redis on the hostname: localhost.--redisport=6379: Use the default Redis port.
- Set Tyk to listen only on a specific domain for all API traffic.
- Set an API to listen on a specific domain (e.g. api1.com, api2.com).
- Split APIs over a domain using a path (e.g. api.com/api1, api.com/api2, moreapis.com/api1, moreapis.com/api2 etc).
- If you have set a hostname for the Gateway, then all non-domain-bound APIs will be on this hostname + the
listen_path.
Install Tyk on Debian or Ubuntu
Supported Distributions| Distribution | Version | Supported |
|---|---|---|
| Debian | 12 (Bookworm) | ✅ |
| Debian | 11 (Bullseye) | ✅ |
| Ubuntu | 24.04 (Noble) | ✅ |
| Ubuntu | 22.04 (Jammy) | ✅ |
Install Database
Requirements Before installing the Tyk components in the order below, you need to first install Redis and MongoDB/SQL. Getting Started- MongoDB
- SQL
Install MongoDBYou should follow the online tutorial for installing MongoDB. Check the MongoDB supported versions. As part of the MongoDB installation you need to perform the following:
- Import the public key
- Create a list file
- Reload the package database
- Install the MongoDB packages
- Start MongoDB
- Check the
mongodservice is running
- Dashboard
- Pump
-
Gateway
For a production environment, we recommend that the Gateway, Dashboard and Pump are installed on separate machines. If installing multiple Gateways, you should install each on a separate machine. See Planning for Production For more details.
Install Dashboard
Tyk has its own APT repositories hosted by the kind folks at packagecloud.io, which makes it easy, safe and secure to install a trusted distribution of the Tyk Gateway stack. Prerequisites- Have MongoDB/SQL and Redis installed - follow the guide for installing databases on Debian/Ubuntu.
- Ensure port
3000is available. This is used by the Tyk Dashboard to provide the GUI and the Developer Portal.
-a flag in the second Tyk commands - this is important!):
jammy is the code name for Ubuntu 22.04. Please substitute it with your particular ubuntu release, e.g. noble for Ubuntu 24.04.- Added the Tyk Dashboard repository
- Updated our package list
apt-get to install the Tyk Dashboard without prompting. Wait for the downloads to complete.
When the Tyk Dashboard has finished installing, it will have installed some init scripts, but it will not be running yet. The next step will be to setup each application - thankfully this can be done with three very simple commands.
Configure Tyk Dashboard
Prerequisites for MongoDB You need to ensure the MongoDB and Redis services are running before proceeding.You need to replace
<hostname> for --redishost=<hostname>, and <IP Address> for --mongo=mongodb://<IP Address>/ with your own values to run this script.Make sure to use the actual DNS hostname or the public IP of your instance as the last parameter.
--listenport=3000: Told the Tyk Dashboard (and Portal) to listen on port 3000.--redishost=<hostname>: The Tyk Dashboard should use the local Redis instance.--redisport=6379: The Tyk Dashboard should use the default port.--domain="XXX.XXX.XXX.XXX": Bind the Tyk Dashboard to the IP or DNS hostname of this instance (required).--mongo=mongodb://<IP Address>/tyk_analytics: Use the local MongoDB (should always be the same as the gateway).--tyk_api_hostname=$HOSTNAME: The Tyk Dashboard has no idea what hostname has been given to Tyk, so we need to tell it, in this instance we are just using the local HOSTNAME env variable, but you could set this to the public-hostname/IP of the instance.--tyk_node_hostname=http://localhost: The Tyk Dashboard needs to see a Tyk node in order to create new tokens, so we need to tell it where we can find one, in this case, use the one installed locally.--tyk_node_port=8080: Tell the Tyk Dashboard that the Tyk node it should communicate with is on port 8080.--portal_root=/portal: We want the portal to be shown on/portalof whichever domain we set for the portal.
You need to replace
<hostname> for --redishost=<hostname>, and <Postgres Host Name>, <Port>, <User>, <Password>, <DB> for --connection_string="host=<Postgres Host Name> port=<Port> user=<User> password=<Password> dbname=<DB>" with your own values to run this script.Make sure to use the actual DNS hostname or the public IP of your instance as the last parameter.
--listenport=3000: Told the Tyk Dashboard (and Portal) to listen on port 3000.--redishost=<hostname>: The Tyk Dashboard should use the local Redis instance.--redisport=6379: The Tyk Dashboard should use the default port.--domain="XXX.XXX.XXX.XXX": Bind the dashboard to the IP or DNS hostname of this instance (required).--storage=postgres: Use storage type postgres.--connection_string="host=<Postgres Host Name> port=<Port> user=<User> password=<Password> dbname=<DB>": Use the postgres instance provided in the connection string(should always be the same as the gateway).--tyk_api_hostname=$HOSTNAME: The Tyk Dashboard has no idea what hostname has been given to Tyk, so we need to tell it, in this instance we are just using the local HOSTNAME env variable, but you could set this to the public-hostname/IP of the instance.--tyk_node_hostname=http://localhost: The Tyk Dashboard needs to see a Tyk node in order to create new tokens, so we need to tell it where we can find one, in this case, use the one installed locally.--tyk_node_port=8080: Tell the dashboard that the Tyk node it should communicate with is on port 8080.--portal_root=/portal: We want the portal to be shown on/portalof whichever domain we set for the portal.
/opt/tyk-dashboard/tyk_analytics.conf in the license field.
Step 2: Start the Tyk Dashboard
Start the dashboard service, and ensure it will start automatically on system boot.
- Your Organization Name
- Your Organization Slug
- Your User Email Address
- Your User First and Last Name
- A Password for your User
-
Re-enter your user Password
For a password, we recommend a combination of alphanumeric characters, with both upper and lower case letters.
127.0.0.1:3000, using the username and password created in the Dashboard Setup screen.
Configure your Developer Portal
To set up your Developer Portal follow our Self-Managed tutorial on publishing an API to the Portal Catalog.Install Pump
Prerequisites- You have installed Redis and either MongoDB or SQL.
- You have installed the Tyk Dashboard.
-a flag in the second Tyk commands - this is important!):
jammy is the code name for Ubuntu 22.04. Please substitute it with your particular ubuntu release, e.g. noble for Ubuntu 24.04.- Added the Tyk Pump repository
- Updated our package list
apt-get to install Tyk Pump without prompting. Wait for the downloads to complete.
When Tyk Pump has finished installing, it will have installed some init scripts, but it will not be running yet. The next step will be to setup each application using three very simple commands.
Step 3: Configure Tyk Pump
If you don’t complete this step, you won’t see any analytics in your Dashboard, so to enable the analytics service, we need to ensure Tyk Pump is running and configured properly.
Option 1: Configure Tyk Pump for MongoDB
You need to replace
<hostname> for --redishost=<hostname>, and <IP Address> for --mongo=mongodb://<IP Address>/ with your own values to run this script.You need to replace
<hostname> for --redishost=<hostname>, and <Postgres Host Name>,<Port>, <User>, <Password>, <DB> for --postgres="host=<Postgres Host Name> port=<Port> user=<User> password=<Password> dbname=<DB>" with your own values to run this script.Install Gateway
Tyk has it’s own APT repositories hosted by the kind folks at packagecloud.io, which makes it easy, safe and secure to install a trusted distribution of the Tyk Gateway stack. Prerequisites- Ensure port
8080is available. This is used in this guide for Gateway traffic (API traffic to be proxied). - You have MongoDB and Redis installed.
- You have installed firstly the Tyk Dashboard, then the Tyk Pump.
/etc/apt/sources.list.d/tyk_tyk-gateway.list with the following contents:
jammy is the code name for Ubuntu 22.04. Please substitute it with your particular ubuntu release, e.g. noble for Ubuntu 24.04.- Added the Tyk Gateway repository
- Updated our package list
/etc/hosts file.
Set up Tyk
You can set up the core settings for Tyk Gateway with a single setup script, however for more involved deployments, you will want to provide your own configuration file.
You need to replace
<hostname> for --redishost=<hostname>with your own value to run this script.--dashboard=1: We want to use the Dashboard, since Tyk Gateway gets all it’s API Definitions from the Dashboard service, as of v2.3 Tyk will auto-detect the location of the dashboard, we only need to specify that we should use this mode.--listenport=8080: Tyk should listen on port 8080 for API traffic.--redishost=<hostname>: Use Redis on your hostname.--redisport=6379: Use the default Redis port.
- Set Tyk to listen only on a specific domain for all API traffic.
- Set an API to listen on a specific domain (e.g. api1.com, api2.com).
- Split APIs over a domain using a path (e.g. api.com/api1, api.com/api2, moreapis.com/api1, moreapis.com/api2 etc).
- If you have set a hostname for the Gateway, then all non-domain-bound APIs will be on this hostname + the
listen_path.